Monday, 11 May 2015

Taking a regular "lesson" and moving it outside...why?

Hi everyone!  This is a continuation of a post I did last week when I visited one of our amazing teams. (You can check out how they start their day here-  you won't regret clicking...it is awesome).

I wanted to share with you what happened after they had their outdoor reading time.  It was fabulous. Check out that photo below.   Doesn't that make you want to sit and join?  What an amazing invitation for learning! The mats can be found at Dollarama.  Each one fit 3-4 students.

Seriously....I'm on my way to buy some (any excuse to shop at Dollarama - ha!).


With intentional thought around the transition from reading time to this activity, they continued walking in their train and went right around the circle.  Each student stood in front of a clipboard (not their own...just whichever one was in front of them).  This allowed for a seamless transition. (LOVE that!  Not always an easy task ;)


Once everyone had a spot, the educators began to deliver an explicit math lesson.  Not gonna lie....I was caught off guard.  I was expecting a group discussion, something specific to nature  - but nope :)  These educators went right into a math lesson.  The students explored concepts of size: shorter, longer, size in relation to another object....it was a beautiful thing.  The first challenge was to take their name stick (a tongue depressor that they use for spacing when writing) and find something that was smaller than it.  When they returned to the circle (with their object) they found their correct spot and recorded their findings (note: the educators also gave the students very little direction for this.  They challenged them by saying "How could you record your findings?" They didn't tell them to write a sentence, draw a picture, use labels.  It was open).  The lesson went on to ask the students to find something longer than their name stick.


  They wrapped up the lesson by provoking the students to think about why student A's object might be longer than the stick, yet shorter than student Bs object.  How can something be "longer than" and "shorter than" at the same time?  GREAT QUESTION :)  I am sure that I could see the wheels spinning and their brains growing as they thought about that!


As I stood there watching I was struck at how reflective and intentional these educators were to use the outdoors as a tool for learning.  This lesson could easily have been done indoors, but by taking it outside the behaviours decreased, and the engagement increased.  As the educators and I had an opportunity to observe and reflect they were struck by one student in particular.  This learner struggled to engage in mathematics learning.  It didn't interest him, and as a result his behaviours often escalated during this time.  But here he was, so engaged in the task that he wasn't distracting by anything around him.  He was laying on his tummy and carefully recording his findings on his paper.  This was a significant learning moment for this child.  Can anyone relate?  Can you think of a student who struggles to engage?  Give it a try...take the lesson outside, and see what happens :)

note: this is not the child mentioned above LOL,
just a great shot of an engaged learner :)
Talk again soon ,
Carly

Wednesday, 6 May 2015

Starting the day and setting the tone for learning

I had the pleasure of spending the day with a fabulous team that I have not been able to visit yet this year. We had connected last week at a workshop, and we made a plan for me to visit and support inquiry-based learning.  While I was there I had the pleasure of seeing some of the things we learned at the conference in action.

Since the conference was all about inquiry, and specifically inquiry outside, it was great to see that they started their day....you guessed it, outside.

After the students had come inside for announcements, attendance, etc. they headed back outside for some reading time.  (Just my wonderings here: would it work to have the students stay outside right from the bell and meet them outside?  Would this allow for one less transition?) Anywhoo, each student was armed with a bag of "just right" books at their specific level, and the educators used a "train" to drop the students off at designated spots in the yard.


The educator is at the front of the line, walking around and pointing to a spot for each student to sit (under a tree, in a patch of sun, etc.)  The nice thing about this is that there is no running from spot to spot and no arguing about who gets to sit under which tree.  Perhaps this will allow for a gradual release of responsibility, and once the kids get the idea of spreading out and sitting in a variety of spots they can quickly pick their own sometimes.
Spending time in nature with a good book :)

This school is blessed with a wonderful treed area

At the end of the time the educator starts back at the beginning and picks up the students as the train passes by.  It was so funny for me to watch as the students very diligently waited for the train to pass by before jumping on.  When we did it at the conference with adults we were all hopping on the train at any point as soon as it came close to us ("budgging" if you will) - but not these kiddos.  Despite their friends calling out to them, they waited until the caboose had passed.  So cute!

I really liked this strategy for getting kids settled into reading (or whatever task they had been given...it could be many things: journal writing, drawing, etc).  It avoids the running and chaos of 30 kids trying to find a spot, and the inevitable time wasted switching spots.

As I watched this class engage in their morning reading routine a few things struck me:

1) It was quiet, calm and organized as 30 students moved into place
2) This opportunity to be outside in nature was a calming and grounding experience for the students.  We stood and watched the class for several minutes, all engaged in the task of reading, and loving it!  What a great way to instill a love of reading.
3) I believe this really set the tone for the learning that was going to happen immediately after (I          blogged about that here).  I believe that this is directly linked to how successfully the students were
 able to self-regulate and participate in the explicit instruction to follow.

What do you think?  Give it a try!  Amazing things can happen when you take the learning outside and give students a time to reflect and be still in nature.  LOVE it :)

Carly


Friday, 24 April 2015

2 Stars and Wish...using documentation to push student learning

Holy Doodles!!!  I just had an amazing weekend.  I spent my days travelling to visit 2 schools (specifically 3 educator spaces) and then went to a conference in Niagara Falls.  Although it was a lot of driving, it was well worth it!

I had the pleasure of visiting Jocelyn Schmidt and her DECE partner Ashley in York Region District School Board.  If you do not follow Jocelyn's blog you can check it out here.  They are amazing educators who are identified as a "Learning@School" classroom for their Board.  In a nut shell, this means that they are identified and supported by their board as a classroom that is open to visitors.  It is easy to see why as their passion, their partnership and their commitment to student achievement is so evident.

I thought a quick and easy way to sum up my visit would be to share a few of my favourite things.  Similar to an earlier post sharing great ideas from educators that I have visited this year. (You can check it out here)

By far (I think...as I am typing I am flooded by memories of great things...) my favourite "take-away" from my visit was the "2 stars and wish".
 

Although I have used this approach with providing feedback to students, this was a new way of using it for me.  I LOVED how Jocelyn and Ashley used it to review the previous day's learning, and inspire further learning the next day.

At the end of every day (it only takes about 5 minutes) one of the educators prepares a PicCollage of the days learning.  If you do not know about this app, check it out.  It is free and super user-friendly.  They title it "Our Learning Collage" with the date underneath.  The educator puts in about 5-8 photos of different happenings from the day (a child writing a book, students exploring caterpillars, students outside noticing their shadows, building a structure, etc.) and she writes a sentence of explanation with each one.  The following day they show this to the whole class during a group meeting.  They asks the students involved to explain their learning and what was happening in each photo.  Some students may actually read the note she has written on the page, but many just orally retell what was happening in the picture.  Side note:  the educators also upload this PicCollage to their class website at the end of the day so parents can be involved in the learning.  They can ask their child questions about specific things that are happening in the classroom. LOVE that!  If you do not have a class website or blog, consider making an email list with parent emails.  It would be one click of the button :)  I have found a website that has similar "Learning collages"  check them out here for a visual :)

We saw this practice being used in 2 different classrooms.  One classroom had the stars up on the board without sentences starters.  Each day the children would look at the documentation of the previous day and come up with 2 things they did well (the stars) and identify one wish (the magic wand) for what they wanted to work on or do better that day.  I thought this was a great way to involve students in the documentation, focus them on the importance of learning while at "centres", as well as develop oral language.  In the other classroom, the 2 stars had a sentence starter with them.  The first star said "We worked hard..." and the second star said "We practised..." and the magic wand said "We can learn more about.."  The students used these prompts to frame their thinking.


As you might be able to see, the students then found words from their word wall and circled them :)

If you'd like to give this a try I have provided links to images of stars and magic wands for you to use.  As always, check copyrights of images and so before use :)

Have fun!  Let me know how it goes :)

This blog post has been edited:  I was just surfing around on Jocelyn's website and found a post she did about this very activity.  I referenced her blog earlier, but here is a direct link to the post talking about it :) http://ljpskindergartenteam.blogspot.ca

Wednesday, 22 April 2015

Ideas for Early Years Classrooms (part 1)

In my new role I am fortunate enough to see a lot of classrooms, chat with hundreds of educators, and have amazing resources come across my desk (so to speak of course...my desk is now the trunk of my car).  I find myself trying to remember so many of the ideas and materials that I am seeing, but I worry that when I return to the classroom I will forget it all  (and be kicking myself for the next 10 years).  So my solution was to write a list.  I bought a cute little notebook - in the colour turquoise of course :) and began to write.  The other day I was mentioning my "ideas book" to some DECEs in our board.  They immediately asked if I would share it with them.  And this got me to thinking...I should share it!  I would love to see a collection of ideas that have been tried and tested or have sparked the interest of other educators.  So here is part 1, of what will likely be a big collection over the years.

I will try my best to elaborate, but if you have any questions about any items please leave me a comment and I will try to get back to you.

My list of AWESOME-NESS from my journey:

1.  "Wilderness Fridays" or "Forest Fridays".  Spend day outside - covering all subjects through nature and environment.  Use the natural curiosity website as a resource.  I posted about this idea here

2.  Put scissors and post-it notes at block centre.  Encourages labelling, fine motor, creativity.  I had done pencils and paper...but not scissors!  Love the idea of using this off and on to keep interest alive.

3.  Designate an area in the classroom for snacks - "The cafe".  In the beginning you may need to have a sign-in to keep track of who has visited the snack area.  As the students begin to be able to self-regulate their hunger you may no longer need it - but I recommend tracking it so that you know every child has eaten :)

4.  Provocation activity:  Put a box on each table filled with open-ended materials (random really).  give groups a few minutes to play.  Have them explain to other groups what they did with materials.  compare thinking and creativity.

5.  Put documentation out in community.  For example, if Students did an inquiry on bikes, put it out on community bike path.  If students explored baking, display at local bakery.

6.  Use overhead transparencies to put documentation on students work without writing right on it.

7.  Pass along project work or collaborative projects to next year's teachers.  For example, grade 1 teacher could display the number line the Kinder class made last year.  Creates a sense of connection and familiarity for September.

8.  During an inquiry of colour, have student name paint colours.  (ex. fire engine red, banana yellow).  You could use the crayons with names to provoke thinking.

9.  Hidden alphabet.  Go on a letter hunt for hidden letters.  Corner of bulletin board is letter L, lines in the bricks make letter H.  Extension: as gifts for families, print our the letters for child's last name and frame.  There a lot of books that you can use to spark this inquiry.

10.  Create a space for each child to show their development over the year.  Could have a hand print, several self-portrait drawings throughout the year, evolution of name printing, etc.

So many more to share...but baby steps lol.  I have to keep my mind organized...not an easy task ;)

Chat again soon,
Carly

Tuesday, 3 March 2015

Early Math...math racks and reckenreks

Last year our board gave each kindergarten teacher a list of math manipulatives and asked us to choose what we felt our classrooms needed (amazing, I know!).  I remember our Student Success Teacher (a system leader that is assigned to a group of schools to support PD and student achievement) came to me with my list in hand and said "You didn't sign up for any Reckenreks!?!", to which I responded, "I didn't ask for any because I actually have no idea what they are!" (I felt a little vulnerable admitting this, but that was the truth.  I had never heard of them before).  She promptly said "Well, you need them!  I'll put you down for a full class set, and I'll show you how to use them.  You'll love them!".  (funny side note: when I left my classroom for this new position, she is the teacher that went into my room...so she is REALLY happy that we ordered them lol).

I have read the book "Number talks" by Sherry Parrish (click here for link for book) and they use them in there.  I thought that they were useful, and understood how to use them in that context.  But I saw them as limited.  I didn't see them as an invaluable resource.

Over the past 2 days I have had the pleasure of being at a conference with Cathy Fosnot.  If you have not heard of her, check out her website (http://www.newperspectivesonlearning.com/).  She is a well known leader in early math education.

She shared many things with us, in particular the use of "Math Racks" or Reckenreks.  She developed this manipulative many years ago, and now has a company that produces them for her.  When I checked out the prices I was pleasantly surprised :)  (link to Math Racks from Cathy Fosnot's site).  Now, of course budget is always an issue.  If your school is unable to purchase these racks for you, there are many ways to DIY. Here is a link to one teacher's idea (DIY math rack).  Fosnot recommended that if you are going to build your own, keep the colour beads the same as the racks used in the rest of your school.  For example, her racks have red and white beads starting with 5 red.  She mentioned that it would derail learning to have different colours (even in different grades over the years).

One of my biggest learning moments came when she was talking about Math Racks of 5 and 10.  I didn't know that they came in racks of only 5 or 10.  She said that these are the racks we should be using in Kindergarten and early grade 1.  She continuously emphasized the need for students to have a very solid understand of the landmark number 5.  Only once they had this knowledge, then we move to 10.  This left me with realizing that I need to know more about how to discern when a students truly understands 5.  I think so often, we rush this.  We make the jump to 10 because we know we are on a fast moving train with high expectations.  We need to slow down, and ensure this step is not cut short.   I am very interested to look through her units of study and see how she has introduced the model and build students' capacity with them.

There was great discussion about whether Math Racks are better/worse as ten frames.  I know in our board we have put great emphasis on the 5 and 10 frames.  According to Fosnot, the frames are limiting. It is easier for children to imagine the numbers moving, sliding over to compensate (as opposed to on the ten frames where kids have to take it off the frame and then put it back.  With the Math Rack , it is always there, they see if moving.  I don' think this means that we should abandon the 5/10 frames, rather just be conscious not to limit our teaching to this one model.  However, Fosnot would definitely argue (I think) that the Math Rack is a better tool.

Cathy Fosnot has developed 4 units of study for K-1 classrooms (she has ones for higher grades as well), that use solid research into developing mathematics in young learners.  In these units she uses Math Racks, 5/10 frames, and many different models and strategies.  I have not used these myself, but I am excited to share these with some educators in our board and see how they work.

I know that this post isn't giving you the answers of what to do or how to use math racks, but I don't have the answers yet.  My head is swimming with questions fo where to start, how to know when to move on, etc. My hope is that if you have a few moments you will look into Cathy Fosnot's work and contact your board systems leaders to see if you can get your hands on the Cathy Fosnot resources (If you are in my board - all of our SSTs were at the conference this week, so you can chat with them about Cathy Fosnot as well).

I think you will find it time well spent.


Tuesday, 11 November 2014

Identity Study


To see how a child perceives him or herself is a glimpse into his or her observational mind.  In a self-portrait, we see what children value about their physical selves and their general self-perceptions.


Over time, as we compare the differences in their portraits, we can see the cognitive and fine-motor development of the child.  By noticing similarities in the pictures, we see the aesthetic of the child's work - although the pictures become much more detailed and complex as the child develops, we are able to see the progression of the child's artistic style.
 - Lois Malaguzzi


We wanted to start the year by having the children get to know themselves.  To really stop and take a look at themselves.  And then to begin to notice similarities and differences between them and their peers.  We believed that if they truly began to look at themselves physically, they may begin to look at themselves in terms of their interests, their strengths and their weaknesses.  We wanted to lay a foundation for a year long Identity Study.

We set out mirrors around the room, some big, some small, and left paper, pencils and pencil crayons beside them.  We didn't give any instructions of what to draw.  Some students drew pictures of lowers or cars, but many of them drew pictures of themselves.  This big mirror and the free standing one below drew a lot of attention.  Without even realizing it students were watching themselves in the mirror, making faces, smiling at themselves, etc.  It was a lot of fun just to stand back and watch.

It also made me a little sad to see how some students did not like to look at themselves in the mirror.  They avoided these centers, or if they were there it was a quick glance with no smile.  This made my wonder...why is that?  Do they not like their own reflection?  Maybe they don't have access to a mirror at home at their height and so it is a whole new experience and therefore a little uncomfortable?  Does it mean nothing and would be considered "normal" behaviour?  I have no idea, but I hoped our Identity study this year would lead them to a place where they got to know themselves and truly like who they were.
The awareness of being and the means of expressing ones "me-ness"...the face discovers its own image..."  - Lois Malaguzzi


In about October/November, of last year, a colleague and I had the pleasure of going to visit the Hawkins Exhibit and attend a workshop on "messing about".  The host school let us tour their classrooms and we came across this idea that tied so perfectly into our Identity study.  We printed an 8x10 headshot photo of each student and then placed an overhead transparency on top.  We had the children trace themselves with a sharpie marker.  Intially I had planned on calling 3 or 4 students at a time and sitting with them in small group to do this.  I had envisioned me do more trouble shooting and encouraging, but after the first group I quickly realized the rich learning opportunity this was.  The kids were engrossed with the details of their face.   It was like they were discovering things about themselves for the first time.  They had so many questions and comments:  "Why do I have hair in my nose?"  "Why do I have so much hair in my eyebrows?"  "My hair is messy today!"   "My eyes are shaped like a moon".  I could go on.  It was wonderful to be a part of this self-discovery.  What we thought would be finished in a few days took almost a week and a half.  But it was well worth it.


Sample of the transparency drawings


Prior to doing this activity we had begun an identity board for each child.  It has a photo of them, their handprint, they wrote their name and there is a spot for a self-portrait drawing.  We had them do their first self-portrait drawing earlier in the year.  The day after they finished this detailed portrait using the transparency we asked them to do a second drawing for their board.  The increase in detail was remarkable.  


Monday, 10 November 2014

Where does an inquiry come from?

I am not sure about you, but this is a big question for me.  As I began my journey into inquiry-based and play-based learning this was a scary thing.  What do you mean you just listen to students?  What if I don't hear anything?  What if we get no "sparks"?

Today I met with a teacher who is new to inquiry-based learning.  She is fabulous!  Like many of us, she knows where she wants to be, she knows what vision she has for her class, but there is that big question - "How do we get there?"

When I arrived today the educators in the room had provided several pumpkins and gourds.  I noticed that they had intentionally placed a basket of click cubes beside the pumpkins.  I immediately was drawn here, and sat a listened to what was happening during play.  As I observed, I tried to think about what my "intentionally interruption" should be.  I am trying to hone my skills of listening and interrupting only to further learning.  This is tough for me....I like to chat :)  I also like to get in there and play, but I am learning that when I do that, I can sometimes stop or change the direction of play.  I am working on it :)

So we can see below that these little explorers were beginning to measure using the cubes (YES!!!  It is like they read their teachers' minds lol)
Hard at work lining up the cubes.  It was interesting to note who included the stem as
part of the height, and who only counted the orange pumpkin.


They spent quite a while doing this.  Although there was rich discussion and sharing of findings, I was wondering if I could push them to consolidate their thinking.  What should I say, if anything?  I decided to ask them if they had finished measuring all the pumpkins.  When they had, I asked them if they thought they would be able to line them up from tallest to shortest.  This made their eyes pop out a little bit, and sent them frantically to work lol.


I loved to watch as some of the students remeasured using the cubes, other students resorted to using their hand to compare (see pic below) and sometimes they just picked up 2 pumpkins and compared them visually.  I left them on their own for a few minutes and asked them to come and find me when they were done.
Note the 3rd and 4th pumpkin from the left.  There was good discussion about these 2.
Which was taller?  Should we include the stem as part of the pumpkin?
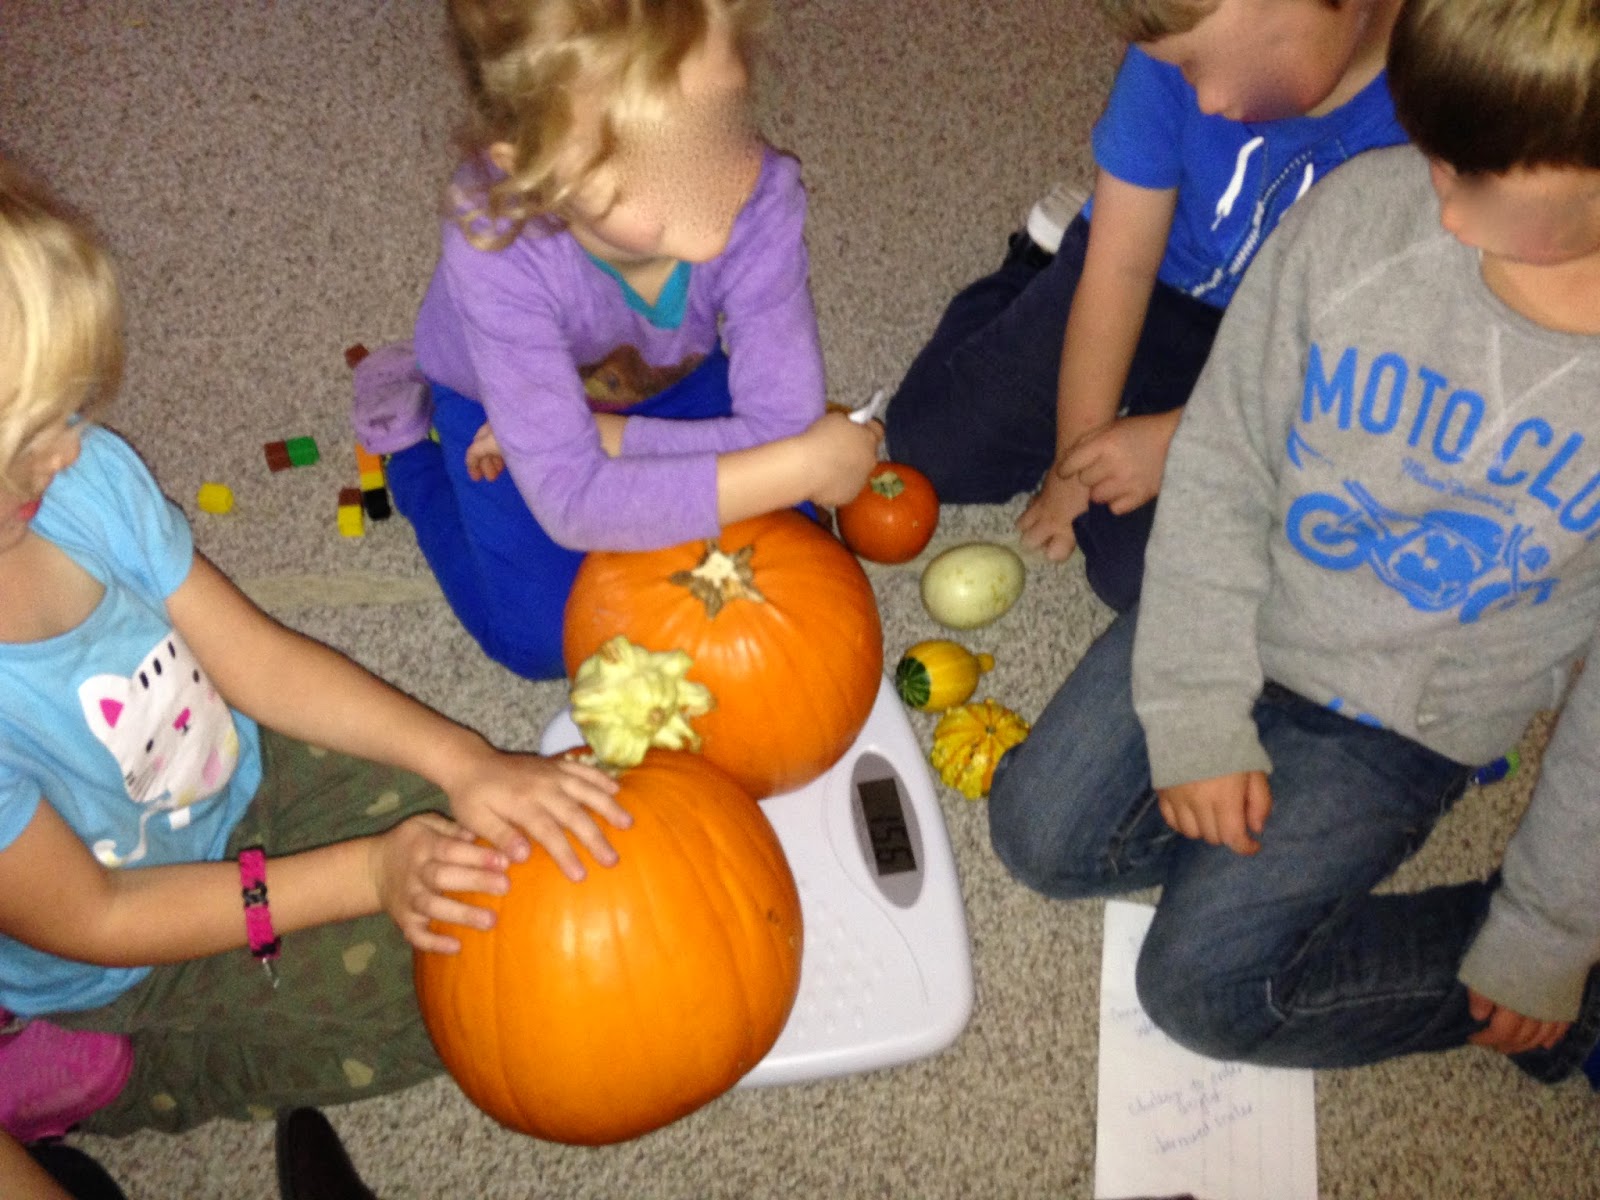
After this task was complete the boys went on playing with the pumpkins.  Some tried to roll them (**perhaps an inquiry into ramps and inclines???), while other began to build with the cubes, not concerned with the pumpkins any more.  I thought about ways to extend this learning and exploring about measurement.  So I asked some student who were around if they thought they could order the pumpkins by weights?  They  immediately began picking up pumpkins and using their judgement to determine which was heavy, which ones were light.  They began to sort them into 2 group: heavy pumpkins and light pumpkins.  I asked them if they knew of a tool that could help us weight them.  They didn't really give me a response so I offered the idea of a scale.  One of their teachers said they knew the other class had a scale, and so we went to borrow it.
We discovered quickly that it had to be quite heavy to register a weight.
They explored putting different combinations of pumpkins on the scale to see if it would work.
I went and grabbed a smaller scale to see if we could explore weighing the smaller items.  This was a new tool for the students, and so I let them freely explore the tool, and took the opportunity to discuss how to use it safely and gently.  I think they may continue to explore these scales and the concepts of weight :)


It was so wonderful to be back in the classroom laying on my belly taking notes and tons of pictures!  I love my job :)  As Early Educators we really do have the best job in the world!!

Chat again soon,
Carly